Peplums and Proportion- It’s All About The Length

I deliberately chose photos for this post that some may find challenging.  Please let’s not snark on bodies or on personalities in the comments.  Whether the person is fat or thin or famous or obscure, body-snark is not acceptable.  We are looking at the variations of a cut of fabric, objectively, with the aim of improving our sewing.

Peplum-snarking is fair game though- the peplum is an object and not a human being.

Watch the Length

click for source- really great blog

click for source- really great blog

Remember a few months ago when I asked for hand-widths?  I was working on the proportions of the Hummingbird Peplum.  My own hand width seemed to create a pleasing peplum width for my proportions, and I wondered if that would work for other sizes.  Not so much, and I found another way to scale the peplums for size.

This photo shows a peplum silhouette I see all the time, and it drives me a little crazy!  (Ever see someone out and about and think “Please let me lengthen your peplum?” That’s me..)  The shorter peplum combined with larger hips only serves to exaggerate the hip width here, and it looks a little like the top of the model’s body doesn’t belong with her hips below.  Of course they do!  Here’s a few more examples of disproportionate peplum length:

click for source

click for source

This looks off in much the same way as the first peplum top + pants combination, though this peplum is a little longer.  The mis-matched effect is exacerbated by the use of a dark fabric on top and a lighter fabric below and by the face that the waistline seam looks like it’s higher than her natural waist, not deliberately* but in a “Ready-to-wear-clothing-is-my-only-choice” way.

click for source

click for source

This is an example of a mis-placed waist seam.  The beauty of a peplum is that it creates the illusion of a waist for those who might not have much definition in that area, and for those who do have a waist it’s one of those styles that accentuates the waist and forgives the muffin tops / tummy area. Why oh why hike that seam up to the underbust area??  This might be cute on those with a straight up and down figure, but I think that’s all…

click for source- cute blog post on some interesting peplums

click for source- cute blog post on some interesting peplums

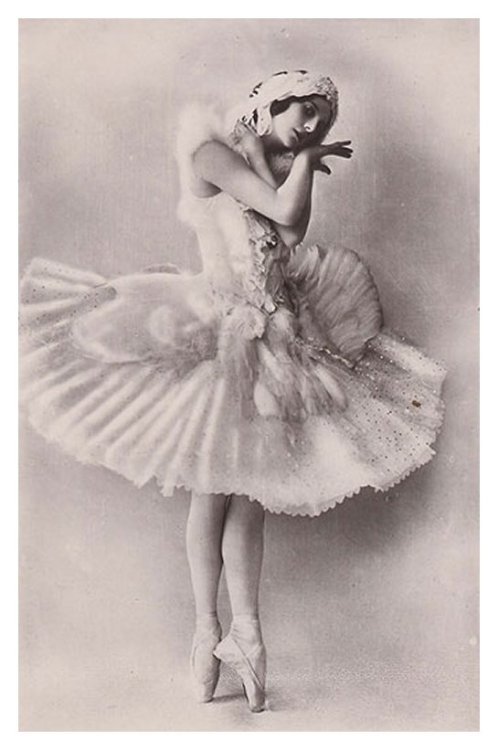
On the other hand, too long or too full of a peplum can dwarf a thinner/petite figure.  To me this peplum looks like it’s right on the edge of swallowing her whole.

click for source

click for source

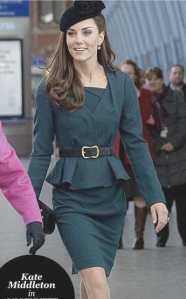
Meanwhile, the Duchess of Cambridge wears a small, neat peplum that matches her small, neat frame.

Kim K and Ruffled Peplums

click for source

click for source

click for source

click for source

I don’t know who is in charge of dressing this woman, but I think they ought to be fired.   Whatever we may think of her career, she’s a beautiful woman with a fuller figure who makes interesting style choices.  A little ruffled peplum like this isn’t right for her.  For one, it’s far too narrow to work with her proportions.  For the other, the gathered ruffle just adds bulk around her midsection, rather than grace.

click for source post

click for source post

But here the ruffled peplum band (it’s on the skirt rather than the top…) works great for a thinner figure.  It’s not so long or fluffy that it overpowers her frame, and lends a little softness.

Peplums and Tummies

click for source

click for source

I like this dress on this model.  It’s a great color for her, and the fit looks good too.  I’d suggest the addition of a belt (because I’m not a fan of elastic waists sans belts), and once again I find myself wishing I could add some length to a RTW peplum.  Try holding your finger up to the computer screen just below the hem and take a good look.  Then pull your finger away.  A little extra length there would go a long way towards creating a more pleasing set of proportions (and maybe move that waistline seam a few inches south).  That’s what I mean when I talk about peplums lending grace to the figure.  Like this one:

click for source

click for source

I love this!  The colors work well for her, and the peplum is very well proportioned for her figure.  She looks like her clothes belong to her.

Sewists’ Tips for Peplum Proportion:

Remember, we can sew.  We are not at the mercy of RTW and arbitrary peplum lengths.  To make a nicely proportioned peplum top regardless of figure size or shape, it’s easy to add some length or remove it when we cut.  The Hummingbird Peplum is proportionately wider as size increases.

  • *Use waistline seam placement to your advantage.  Shorter waisted people can balance their figure visually by placing a waistline seam slightly lower than their natural waist, and a long-waisted person can place the seam a little higher than their natural waist.  It’s a small way to trick the eye, 1-2″ or so but no more.
click for source

click for source

  • The hem of the peplum should hit just above the fullest part of the hip for optimal visual impact.  The eye will follow the hip curve as it bends towards the waist and disappears into the peplum.  Regardless of tummy or muffin bulge (which disappears under the peplum anyway), this is the most pleasing hem placement for that reason.
  • For those who wish to lend grace to the tummy area, forget about the hip-curve hem placement and instead focus on hemming the peplum slightly below the tummy.
  • Smaller figures look best in smaller peplums- either tailored or ruffly, but keep in mind the Hungry Peplum Monster- an oversized peplum that will swamp a smaller frame. 

I pinned more “good” peplums for various figure types (skewing toward curvy), check it out for inspiration.

What do you think about peplum proportioning?  If you’d like to add an image to illustrate your idea, then do link.  Linking is good.

Birth Story from Brisbane

This isn’t a topic I’d usually mention, but yesterday I had a powerful experience that I can’t not share with you all.  This is not sewing, this is birthing.  If that’s not your cup of tea, check back in a few days because I’m fielding email sewing questions.  (Do email me some more questions, too!)
Picture 4

Several years ago, I met Enid when I taught her to sew.   Once she got the basics down, I saw Enid again many times as she came to me to help alter her wedding dress and make a silk 1950’s reception gown.  That’s right, Vogue 1140 was her second make after beginner’s pajamas!   We built a friendship over the years, both of us strong and somewhat domineering women with small children and a shared sense of disconnect as immigrants far from home.  She’s English and I’m from Texas.

Last year, she became pregnant with her second baby and asked me to be her support person for the birth.  I said yes- for some friends that is the only possible answer.  Her first birth had been somewhat traumatic, with her baby being taken away for extra care and observation for several hours after a difficult ordeal.  This time around, she worked hard on learning breathing and pain management, educating herself about active labor to prepare for a positive birthing experience.  Enid is the type of person who knows what she wants and works hard to achieve it.  She balances that with an open-minded attitude, accepting that sometimes nothing goes to plan.
Picture 5

I got a series of calls and texts from her first thing in the morning Sunday- the baby was coming, two weeks early!  I was down the coast for the weekend, but we packed up the car and hurried back to The ‘Bane.  When I arrived at the hospital a few hours later, I found her quietly timing contractions in a Birth suite Centre at Royal Brisbane Women’s Hospital.

Picture 6

We spent the entire day together in the Birth Centre, in a place outside time and reality.  It’s a large room with an oversized recliner, a fold out couch, a table, a homey bed, a shower, beanbags, a deep birthing pool and other special touches like an aromatherapy nebulizer (clary sage!) and a selection of soothing music.  It was dark and quiet.  In the time between contractions, I did my best to keep her calm and make her laugh.  (Sometimes I have a bawdy sense of humor, which seemed to work given our situation!)  We had a great time, riding the waves of pain that steadily increased in frequency and relaxing between.  Is it just me, or is labor and birth very different than TV and movies lead us to believe?

 She was very British about the pain, breathing strongly but barely moaning.
blue ball

At one point in the late afternoon, the contractions stalled and become erratic so we turned to Twitter for advice.  We’re both Millinneals, you see, so it’s second nature.  The first suggestion was an exercise ball, and our beautifully stocked room had one!  The ball radically changed the tempo and the speed of the labor as she gently rocked and we breathed through the pain.  In between, we managed quite a few adolescent jokes about blue balls, cackling mischievously.

this was before we filled it, early in the day.

this was before we filled it, early in the day.

The midwife and I filled up the birthing tub and waited for the right time to help Enid into the water.  She had been maintaining her “stiff upper lip” as the time between the contractions lessened and the duration increased.  She was desperate to get into the tub.  Something incredible happened when she slipped into the water, something unexpected that I will never forget for the rest of my life.

She sang.  Not a song, no words, but a strong sweet soprano sound tinged with pain that raises the hairs on my arms when I recall it.  It wasn’t a shriek, or a howl, or a scream, but a pure sound.  I held her, stroked her back and breathed with her through the sound and the pain and the occasional silences for maybe 40 minutes while she finished the journey all mothers must make in their own way.  I didn’t see her face the entire time, her head dropped and she focused on laboring.  Suddenly, at the end of a very strong contraction she jerked upright with brilliant eyes and suddenly I saw a perfect tiny baby girl in her arms, breaking through the surface of the bath.  Just like that, little G joined us.  We were in semi darkness, it was warm and quiet as she took her first breaths and blinked up at her mother.  I stood there sobbing and laughing at the same time for a minute or two before I had the presence of mind to document the moment for Enid through my lens.

E and G

She held her little girl close and without prompting this pushy, tiny female found her mother’s nipple and latched on.  She knew what she wanted and went for it!  Just like her mom.   The midwife and I helped Enid out of the water and into a recovery position, where she held her new baby close and the rest of the world melted away around them.  She cut the cord herself.  Our bodies truly do amazing things!

My own daughter was born down the hall from little G, five years ago.   As I was then, I’m moved by the consideration shown laboring women at Royal Brisbane Women’s Hospital.  They understand labor.   They know births are unpredictable and unique.  They support the individual’s laboring choices while keeping a very sharp lookout for the health of both mother and child.  They are strong and kind, with clear voices and sensible grippy ballet flat shoes.

I really can’t say enough good things about the quality of care and what a beautiful experience this was.  That’s why I’m writing this with Enid’s blessing and encouragement- because it’s important to talk about good things.  We’re both grateful, as mothers and as transplants, and wanted to share.

You know what else?  That room, that birth, her pre-natal physical therapy appointments and the post-natal home visits are provided by Queensland as a matter of course.  I couldn’t believe it when I had my own child, I kept expecting to receive a massive unpayable bill but none ever came.   Public health is a priority here, I think it is an admirable attitude- the health of Queenslanders is provided for by Queenslanders.

There’s a special dignity to the concept of running a labor ward not for profit but as a service to the community.  It eliminates a great deal of anxiety from pivotal moments like these so it’s easier to focus on what’s important.  It’s not a perfect system, but I think it’s pretty remarkable.   Thank you, Queensland, for looking out for birthing mothers and their babies.

What are you grateful for?

Who Is Anna Pavlova?

But first: the next two giveaway winners:

Picture 28 Picture 29

Email me, ladies (stephc at 3hourspast dot com) and I’ll get your sample packs to you in the post!

Anna Pavlova

The Pavlova Wrap Top & Skirt from Cake Patterns is named after a beloved Antipodean meringue and fruit dish.   It’s a controversial issue Down Under, and tomorrow I want you all to tell me what’s the best way to make them. But first, I’d like to take a look at Anna Pavlova- the dessert’s ballerina namesake.

click for source

click for source

Anna Pavlova was born in St. Petersberg Russia in 1881 and died in 1931.   Her performances enraptured crowds of people from Russia to Peru to Sydney and inspired countless people to also take up dance.  It’s tough to come to grips with the star quality of legends who lived and died outside of film from the vantage point of 2013.  I sifted through various writings about Anna and discovered this quote from her first choreographer:

Picture 31

“You must realize that your daintiness and fragility are your greatest assets. You should always do the kind of dancing which brings out your own rare qualities instead of trying to win praise by mere acrobatic tricks.”

This is interesting.  I’m no scholar on the history of ballet (chime in if you are!), but I discovered that at the time ballet dancers were strong.  Acrobatic.  One article uses the word “meatball” to describe the characteristics of ballerinas at the time Anna began dancing.    We take fragile, dainty ballerinas for granted, but not back then!  How things change…

click for source

click for source

Anna took the advice of her choreographer.  Rather than trying to imperfectly emulate “le mode,”  Anna threw her passion for dance into ballet performances done her own way.  Crowds adored her for it- the expression of her love of dance and of motion on stage, presented in her own individual manner.

click for source

click for source

Over the course of her career, Anna racked up 350,000 miles traveling the world. Without an airplane!  This was also peculiar at the time, and set her apart from other performers.  She’d have to be pretty adventurous and tough to handle that kind of touring.

click for source

click for source

No doubt weakened by her punishing work schedule, Anna succumbed to pleurisy at the age of 50.  Tellingly, some sources say the doctors could have saved her but she resisted because the operation would leave her unable to dance.  She lived and died for her art, inspiring unknown numbers of people through her passion.

Picture 36

She was wise, too:

“What exactly is success? For me it is to be found not in applause, but in the satisfaction of feeling that one is realizing one’s ideal. When, a small child rambling over there by the fir trees, I thought that success spelled happiness. I was wrong. Happiness is like a butterfly which appears and delights us for one brief moment, but soon flits away.”

Anna Pavlova

Read more about Anna’s life at the V&A and also here at Great Russian Women.  Both excellent articles.

Have you met Anna before?   How do you express your individuality through your occupation?

OCC Lip Tar Sampler Giveaway!

I love lipstick.  Some time ago, my friend Veronica at Vegan Beauty.com.au sent me some lovely Lime Crime eyeliner and lipstick to try.  I’ve since thrown out my old reds and invested in another tube of Lime Crime- Retrofuturist.  Then Veronica sent me several sample pots of OCC “Lip Tar” in her picks for my coloring.  Veronica is a devoted vegan, and also a very talented makeup artist– her picks for me have never gone wrong:

I’ve been tweeting my morning lipstick lately.  I wear lipstick every day, even when I don’t leave the house. When I wear lipstick, I feel more “together”- like I’m at work.  I am at work.  It’s good because if I have to drop everything and rush out to get proofs printed, or someone drops by to consult, I’m ready to go.  My morning twitter lipstick conversations are fun, too, a little light chatting with other lipstick buddies about color.

after field testing, I got myself a tube of Demure, and a tube of NSFW.  Love them, they'll last for years...

after field testing, I got myself a tube of Demure, and a tube of NSFW. Love them, they’ll last for years…

I’m not vegan, but I don’t like what I found when I looked into the ethics of makeup manufacture.  It seems to me that in the modern world almost everything we do is somehow unethical- hurting the environment, hurting animals, hurting sweatshop workers in developing countries.   I try to find ways to make the ethical switch where I can, and not beat myself up too much about the other stuff.

So far, I can say without reservation that the vegan lipsticks and other makeup I’ve tried have been extremely high-performance.  For me, choosing to use cruelty free makeup is easy.  It’s not more expensive than regular drugstore brands (here), and, well, I know a rabbit wasn’t tortured to give me my red lipstick.   That’s my choice, my experience.

Application

Lip brush

When Veronica first sent me a sample pack of Lip Tars, I sloshed the whole sample pot on my lips with my fingers and to my dismay watched the Lip Tar feather all over my face and my hands and fingers and any surface I walked near.  It’s packed with pigment.  When I wrote to Veronica, she gently suggested a drop of Lip Tar on a brush would go a long way.  I prefer a brush anyway, and discovered the tiniest bit of Lip Tar gave me great coverage.  I apply a thin layer, blot, apply another layer, blot, and then dot a bit on my cheeks and blend.  Marvelous.  Once the Lip Tar settles, it’s a very soft and lasts nearly all day (not like tar at all).

The Goods

VeganBeautyLipTarGiveaway

I love Lip Tars (and playing with new-to-me colors) so much, I asked Veronica to put together a few sample packs for us!  I have these lovely little sets to send out to y’all over the next week!  I’ll choose two winners a day and announce the winners in each post this week- two a day.  (I’m so hooked on giveaways…)  Each pot holds enough for 3-5 applications.  At least.

Get In On the Goods

If you’d like to play, the rules are simple.  Leave me some comments (each bullet point is a potential comment):

  • What’s your usual color?
  • link to an article about animal testing (I need to be educated)
  • Extra 2 points for Australian readers- Vegan Beauty is an Australian online retailer
  • Tweet this post
  • Facebook this post
  • Pin this post

I’ll pick two winners using the Random Number Generator each day this week, Monday-Friday.

IMG_5730

Don’t forget to pick up your Pavlova pattern by Friday to be included in the “sorting” for the Sewalong!

Video chat with StephC and Beginner’s Sewing in Brisbane

I’m really, really enjoying the Tiramisu 30 Minutes a Day Sewalong.  To be sure, it’s a lot of work, but *this* is why I started making patterns- so I could put my concepts into your hands and we could work together to make pretty clothes.  It’s just so fun!

I’ve been carefully monitoring the flickr stream discussions and the sewalong comments sections because it’s important to me to keep my ears open and tailor the sewalong to your needs and questions.  I’ve been teaching this way for years locally, and now that I’ve mostly filled my technological knowledge gaps, I want to bring my offline teaching concepts online and into your sewing room.  I’ve shown a lot of restraint in my blogging over the past several years, preferring to sew socially online and teach offline, but that’s changing.

I hadn’t planned to make a video for today’s lesson in the sewalong, but after reading some underbust seam troubles in the flickr group and on some blogs, not to mention the emails, I chose to change today’s lesson to show you how to problem solve on a real Tiramisu dress in motion.  I’ll publish those clips in Lesson 5.

Once I’d finished the sewalong clips, I found I had a lot of thoughts to share about body speech and body comparison.  This is not aimed at any particular person, this is me sharing with you a topic that is really close to my heart which underpins everything I’m doing and will do with Cake Patterns.  Brisbane students of mine will recognize parts of this chat, it comes up in almost every class I teach.  I hope you’ll indulge me and lend an ear- and please feel free to share your perspective in the comments below.

I’ve listened to too many women say too many awful things about themselves (sometimes I feel like a body-image confessor of sorts- I think other sewing teachers and fitters will know what I’m talking about).  Lately it’s been coming up in all kinds of other conversations I have- all the time!  Even worse, I’ve been hearing women compare themselves to other women unfavorably.  Stoppit!  It’s not useful!  Collaborate, don’t compare!

(I’d been taping and sewing and trying on a dress all afternoon in the very warm livingroom, so do forgive the state of my hair! )  This is not the first time I’ve discussed body speech and sewing, but these are perhaps the strongest words I’ve used.

From Zilch to Zips Beginner's Sewing | Voodoo Rabbit | StephC

Meanwhile, if you live in Brisbane and you’d like to work with me to build a solid foundation in basic sewing, I’m pleased to announce a 5 week beginners class I’ll be teaching at Voodoo Rabbit from the 22nd of this month.  We’re calling it “From Zilch to Zips” because that’s what we’ll do- learn solid sewing techniques from nothing to invisible zipper insertion.

Class Schedule

We’ll make a simple shopping tote on the first night, and discuss fabric shopping for your other two projects- a Blank Canvas Tee (basic knitwear, paper pattern provided in class) and a lovely A-line skirt (wovens, hems, zips!)!  It’s a weekly Tuesday evening class, from 6-9pm beginning on the22 of January.  Space is limited to allow maximum teacher interaction, so do go check out the class listing at Voodoo Rabbit and sign up!

I’m also starting up intermediate classes once again- the “bring your own,” ever changing, open sewing class we used to enjoy so much.  I’ll be announcing the date soon so keep an eye out- it’s a one or two session weekend class.

**Also, I’m teaching an all-day Tiramisu Knit Dress class at Voodoo Rabbit on Sunday the 13th (this Sunday) from 12-5.  If you’d like to join up, I still have a space!  Email me stephc@3hourspast.com

From “Pinning” to “Doing” : The Egg White Face Mask

Picture 13

I like slapping stuff on my face from the pantry to see what happens, it’s interesting.  And cheap.  And I feel like I’m sticking it to “the man” somehow (no one sells me beauty products by making me feel ugly).   I also strive to try out new things I find on Pinterest and the egg white mask kept showing up…

My skin gets gross in the summer.  I like to keep my skin tidy and clear so I don’t feel the need to wear foundation.  There’s a few obvious skin fixes like adequate hydration, quality sleep, exercise and a decent diet.  That’s not always simple to maintain.  Besides, my pore problems run a little deeper than needing more beauty sleep once the heat, humidity and UV start taking their toll.  (Not to mention the copious amounts of sunscreen I wear.)

In the past, I’ve used an oat bran mask to soften and cleanse my skin.  It’s great, does a beautiful job- especially when mixed with a spoonful of plain yogurt.  The only thing I don’t love about it is it can be kind of sloppy to apply and chunky to remove.  This is no problem when I need a really deep scrub, but I wanted to find a skin fix  halfway between an oat mask and a regular cleanse.

Egg White Face Mask 1 | 3 Hours Past

Egg white masks are exactly what they sound like- egg whites.  That’s it. It tightens the skin, minimizes pores, smoothes out the skin’s texture and removes blackheads- gently.   Just whip it up a little so it froths. (Egg yolk hair masks are marvelous, btw.)

Egg White Face Mask 2 | 3 Hours PastI took these pictures the morning after a late night with a friend, you can still see the remnants of a nuevo-flapper eyeliner experiment around my eyes.  I quickly washed my face, but nothing serious.

Egg White Face Mask 3 | 3 Hours PastI applied the mask with my fingers.  It does smell like eggs, but I don’t find the scent too unpleasant.  The egg whites feel like a slightly viscous mask, the kind that will indeed tighten and tone the skin and perhaps peel off.  Then I wait.  It dries after about 15 minutes.

Egg White Face Mask 4 | 3 Hours PastWhen it’s dry, my face feels completely immobile.  Is this what it feels like to get Botox?  Then I rinse it off with cool water.  It comes off quite readily, I finger-scrub using a circular motion to clear off every last bit of egg.

Then I pat dry and apply Sorbolene.  By the way- that’s the best best best moisturizer I’ve used in my life.  It’s better than all of the expensive creams I tried to get my skin under control, it’s better than the “I don’t have rent to pay but I have a job” potions I used in highschool, it’s better than the organic flowery smelling stuff at Lush.  It’s simply the best thing I’ve ever put on my skin.  A $5 bottle of Sorbolene has lasted me the better part of a year. (It’s also fantastic for removing clown makeup and shaving.) $5 for a year’s worth of the best moisturizer I’ve ever used.

Egg White Face Mask 5 | 3 Hours PastThe egg white mask removes my greasies, drags out the impurities and leaves behind smooth-as-charmeuse skin with very little mess or inconvenience.  Once I saw the results were worth it, I got over the scent of raw egg.  I always notice my skin continues to spit out yucky things for a little while after I remove the mask.  Is that TMI?

Egg White Face Mask Final | 3 Hours PastI did not, did not apply anything except OCC Lip Tar NSFW before taking this last shot.  I like a monochromatic look, so I dabbed a tiny bit of Lip Tar on the apples of my cheeks.  I took all of these phone camera photos within the same 20 minutes or so in my bathroom.

I took all of these photos right after my egg white mask.  No foundation, though I did use some other paints...

I took all of these photos right after my egg white mask. No foundation, though I did use some other paints…

In fact, I think the effect is even more pronounced on a proper camera so the egg white mask has become a part of the photo-shoot process around here.  I want to look nice for y’all.  I save the leftover egg whites in the fridge and re-apply for several days in a row.  It’s gentle and by the time I use up the entire egg white, I feel incandescent.

Click for source

Click for source

Next time I get the itch to try something weird on my skin, I may try the gelatin mask.  I’ve read mixed reviews, so I’m feeling more cautious than curious at this point.

Have you ever tried either an oat, egg white, or gelatin mask?  How did that work out?  What other masks (of any type) do you like to use?  I can’t be the only face mask addict out there…

Cake Cake Cake

By this weekend, I’ll have published the last of the Tiramisu Support pages on sewingcake.com, including the FBA page and the Sleeves hack.  Tira’s been quite an interesting learning experience, and while it shows in the pattern that Tiramisu was my first release I’m still proud of what we’ve accomplished.

We.  You, me, and my long-suffering husband and friends.  I didn’t broadcast this widely before, but I want you to know that Cake Patterns and the Tiramisu Knit Dress Pattern came to life without me having to take out any business loans.  The pre-sale covered production costs for the pattern, and while I haven’t paid myself or contributed to our rent or upgraded my equipment yet, I think that’s something to be proud of.  It’s a big deal to me.

Thank you.

It took over 6 months to build Cake, figure out the process, pole-vault over hurdles and deliver Tiramisu to your doorsteps and letter boxes.  Pavlova, the second release, has been in production since late October and is nearing completion!  We should go to print in early January.  That’s more or less 6 weeks versus 6 months to produce a pattern.  I’ll be running the Tiramisu 30 Minute A Day Sewalong in early January, and want to focus my energy on that project.

Pavlova Circus And Pre-Sale | Dec 15-20 | Cake PatternsCirque

Instead of shooting for an early January Circus that conflicts with the sewalong, I’ll be running the Pavlova Circus and Pre-Sale from December 15th-20th.  It’s shorter this time, dreamier.

During the Pavlova Circus I want to focus more on design inspiration, ballerinas, pattern lore, the new Cake Covergirl and meringues. Oh- and of course, I’ll show you the insides and outs of the many versions of Pavlova I’ve stitched together during production!  Basically, this Circus will be all the delicious types of posts I haven’t been publishing lately but have been dying to.

Besides, at this time of year, who has the brain cells for lengthy tech posts?  Let’s have some fun!

Raven Hair, Pale Skin and Cruelty-Free Red Lips

I don’t often post about makeup, but a colleague recently introduced me to Lime Crime and I must tell you all about it!

Veronica is based out of Brisbane and just launched an online fabric shop, Fabric Fascinations.  I met her at an event earlier this year and her concept of combining cool, quirky or hard-to-find fabrics with ethical cosmetics in one shop appealed to me.   It makes sense!  I wear both fabric and lipstick (occasionally together), why not pick it up from the same shop?

Old Standby Red on top, Lime Crime Glamour 101 below.  Edited to add this comparison.

Later, Veronica sent me a Lime Crime lipstick and eyeliner to review here at 3 Hours Past.  I had never heard of the brand, but you know I like new things so I agreed.  When Veronica suggested a deep red and told me it was vegan, I started to worry.  I’m not vegan!  I don’t wear deep red, I wear bright red!  There’s a sparkly unicorn on the tube- how old am I?

Glamour 101, Lime Crime

But the allure of New overcame my misgivings and I slicked my lips with Glamour 101 shortly after tearing into the contents of my Fabric Fascinations package.  Still shaking my head at the sparkly unicorn, my nose caught a rich scent of vanilla.  Sparkly unicorns and a pretty scent?  I rolled my eyes.  Obviously this is not a serious lipstick, I thought.  15 year old me would be all over this.

I thought wrong.  This lipstick is so much more than a sparkly unicorn.  I applied two coats, blotting between applications and went about my business.  Three hours later, my lips were still Glamour 101 colored!  What’s more, they were pliable and smooth.  Red-lipstick aficionados know the pitfalls of a red pout include lip dehydration, lip hardness and flaking, not to mention fugitive pigments.

This lipstick fits my criteria for “perfect wear” lipstick- I only need re-apply after eating or lecturing.  It feels neither slick nor sticky once applied.  Repeated, constant wear actually seems to improve the texture of my lips.  They feel softer and smoother, as if I’m constantly applying a light intensive moisturizer.  Veronica was right about the deep red- I do like it!

My Lime Crime lipstick actually replaced my bright blue-red (though I haven’t retired it completely), taking up the “heavy use lipstick” spot in my purse.  I took it everywhere with me for two months, sometimes slipping it into my pockets with my keys before going out purseless.

And then one day I opened the washing machine and to my complete and utter horror I saw the lid from my beloved lipstick.  I cursed my carelessness and assumed I’d ruined a load of favorite skirts.  I picked up each garment in turn, holding my breath during inspection and letting it out when I couldn’t find a spot or a smear.  Clean!  At the bottom of the load, I found my lipstick entirely intact without the lid- like new, no problem!  I couldn’t believe it.  Where have you been all my life, Lime Crime?

Smooth, beautiful lines. Easy to control. Stays put.

The eyeliner leaves absolutely nothing to be desired.  In fact, I’ve never been very good at applying liquid liner but this goes on almost like magic.  I don’t know if it’s the formula or the brush or both, but it’s very smooth and doesn’t run or dry too quickly.  I have “Quill,” a deep rich black, but this liner comes in a rainbow of fun colors.

Doe Deere, creative mind behind Lime Crime. Click for company information.

Lime Crime cosmetics are vegan; not only that, they do not test on animals.  This makes them a cruelty free choice.  Veronica decided to stock this line because she’s a stylish vegan lady herself.  I fell in love with the brand because it makes an extremely pleasant and useful product, but I wasn’t sure where I sat on the “cosmetic animal testing” debate.  So I educated myself-

This is a very tame sampling of what I found when I searched google images for “animal testing cosmetics.” Click for a graphic article and the source of this photo. I never stopped to think.

It’s gross.  It’s seriously gross that animals are bred for the express purpose of having various compounds rubbed into their eyes and skin while they’re under restraint, only to be killed after the toxicity data is collected.  I can’t believe I was so ignorant about these disgusting and abusive practices.

Black hair, red lips, and pale skin is a look I love to rock, but not if the price to be paid involves hurting gentle, harmless creatures.  It’s just not worth it.  Animal testing is not required or necessary for cosmetics produced in the United States, but it’s still done for some reason.  Why?

This logo on products in the EU means “no animal testing.”

In 2003, the EU passed regulations banning animal testing for cosmetics, effective from 2013.  Many other countries and companies have followed suit, but there’s still a few notable hold-outs.  It’s tough to strive for ethical consumerism, but at least we have some great consumer resources (listed below).

….also wearing a little something I cooked up from linen jersey. Shh! Not yet!

And Lime Crime.  At least we have Lime Crime!  Aside from the ethics, this lipstick passes my very tough performance tests- it even went through the washing machine and lived to tell the tale.  And it has a sparkly vanilla unicorn!  I’ve grown very fond of her.  What’s not to love?

Have you tried Lime Crime?  Do you wear ethical or vegan cosmetics?  What’s your experience?

More to Read:

PETA’s database of cruelty-free cosmetics and companies

Wikipedia entry on animal testing for cosmetics

Leaping Bunny (Coalition for Consumer Information on Cosmetics)

List of cruelty free UK cosmetics companies

I saw this hat in a window, couldn’t stop thinking about it for two weeks, and went back to claim it for a measly $10!

Disclosure: Veronica from Fabric Fascinations sent me this beautiful Lime Crime lipstick (Glamour 101) and eyeliner (Quill) for review and gave me free rein to say whatever I like about it.  So I did.  And she has a loyal Lime Crime customer in me.

Australians: Can you tell me the name of the flower in my banner?  It’s blooming and fruiting just now right outside my front door.

Finished: Linen/Cotton Bra with Fitting Photos

I just finished my second MakeBra– this one is size 75G (European, keep reading for conversions).  My first MakeBra was a size 80F, and the band was too big.  On top of that, I used the basic 1/2″ (12mm) elastic the bra band was engineered for and it feels very jiggly and insecure when I wear it.

This time, I used both a smaller band size and wider, sturdier elastic.  Lincraft in the Myer Center in Brisbane’s CBD carries a mind-blowing array of lingerie elastics and findings.  Once I nail down my fit and engineering, I’ll have so much fun making pretty bras.  For now, I used a 1″ (25mm) wide soft band elastic.

I really couldn’t stop myself using some pretty blue merino net remnants to line the cups for contrast.  It’s so soft!

I used cotton-linen slub knit for the exterior, and I reinforced the gore with silk organza.  The stitching on this bra is not perfect, but it’s lightyears better than the first one.  I didn’t need to refer to the instructions while sewing, either!  Win!

Last time, I think I might have disappointed some of you by not modeling my creation.  When I started thinking about sewing bras I thought “useful, relatively simple project, something new to play with.” I was not thinking “I’m going to take my top off on the internet.”  In fact, I dismissed the idea outright.  However, since the last bra post several of you have emailed me, tweeted, etc and I realized that showing the fit and exploring it together would be very useful to many of you.  And probably to me, too.

So.  Ok.  I’m taking my top off.  I’m not a model, I’m not a skinny beanpole, I’m a grown woman who has had a child and also become lax about personal fitness.  And I like beer, that’s just not going to change.   If you don’t want to see me in my bra, please go away and come back tomorrow for Day 1 of the Tiramisu Circus!  I can’t wait!

If you’re a grownup and interested in bra fitting as well as the “band size” debate and tackling back fat issues, read on.

The black bra at the top is the “best fit” bra I found hiding in my dresser after the first bra post.  The center gore doesn’t lie flat against my breastbone, but it’s a darn sight better than my other bras.

The purple is the first one I made from my MakeBra pattern.  I’m rather surprised it looks so cute on.  It’s pretty “relaxed,” I feel like I’m braless in it.  Not in a good way.

The white is the most recent make.  I can see the straps are set too wide (easy to fix!) and I don’t believe the cup size or shape is correct.  Again, the gore doesn’t sit flat against my breastbone and the cups just don’t hold my breasts.  It’s “empty” at the bottom even after I re-arranged the breast tissue, and at the CF the cup looks like it could use an extra 3/4″ of space.  Or maybe I should make a bra with a wider gore?  Larger cup size or wider gore?

I have to laugh at the way my breasts have eaten the thin elastic band on the purple bra.  Where did it go?  It flipped up into my breast tissue.  It feels like my breast might pop out of the bottom of the cup at any time.

The other two have a better shape, I think the shape is best on the black bra and my next bra will be made from a similar cut.  The white one feels great.  When I put it on, I forgot I had breasts.  Really.  It’s a strangely liberating feeling.  But I can see the shape of the cups is not correct, even if it is comfortable.

If I had any lingering doubts about my band size, I’m over it now.  The top and bottom are the same band, but the white is wider.  They both lie through the “middle” of my back, as they should.  The poor purple one has ridden north.  Please notice, too, that all of the bands bite into my flesh.  Apparently, this is necessary in order for the band to help carry the weight of the breast.  Breasts aren’t meant to hang from the shoulder!  (This is analogous to my hiking/travel backpack which has a hipbelt to distribute the weight of the pack between my shoulders and hips.)

Also, CBS news got something right– a smaller band does indeed make for fewer back fat rolls.

Getting Sharey

Naked Zoidberg… From Futurama. This is how I feel right about now… ;)  He does look pretty happy though.

When I saw those photos of my back (not to mention while cropping and collaging them) I almost cried.  I don’t often get hung up on body issues, and I spend a fair amount of time and energy trying to help others conquer body issues through sewing.  But to have my self-image shattered by incontrovertible photographic evidence…

well…

I almost didn’t write this post.  I had no idea I looked like that from behind.

click for source.

I don’t weigh myself.  I don’t believe in it, and didn’t when I was thinner.  What am I, a prize pig about to be sent to slaughter to the highest bidder?  No thanks.  I don’t honestly know the point of using weight as a measure of anything, except to establish some sort of b*tchy body-size pecking order (speaking from experience here, I would love to hear yours!).  There are other ways to analyze the body for good health and fitness, which is more important than aesthetics.

I do know my measurements, and I have also noticed a steady decline in my fitness levels from a year ago.  I catch colds more easily, I can’t leap up the back stairs like I used to, less muscle tone and I haven’t been hiking or kayaking in ages.  My body also feels sluggish.  This bothers me much more than my mother’s gentle inquiry via Skype about the last time I weighed myself.

I’m only plugging this because I have found it to be incredibly useful. Click for source.

My husband became concerned about his own fitness a few weeks ago and started training for a 5K.  I joined him, and now we tag-team most mornings with our Ease Into 5K app.  I can hardly believe that in a few weeks I’ll be running at 30 minute intervals, but I know I like feeling fit and strong.  I miss it.  Besides, the program is very easy to start.  Nothing too hard-core.

But you know what will force me into my running shoes at 6am until I build the habit of a morning run?  Not the knowledge that I like feeling like an Amazon (I really, really do), but the image of my back rolls burned into my brain.

With body image issues, I’m generally of a certain mindset- “If I don’t like it, change it.  If I can’t change it, embrace it.”

Further Reading

Confidential To You: Your Bra Band Doesn’t Fit NY Times

Professional Bra Fitting: Boobs, Physics and Back Fat

The Correct Way To Measure Your Bra Size (I’m a convert.  Seriously. Also an awesome blog.)

Recent Article From NY Times: More Data Suggest Fitness Matters More Than Weight

What do you think?  Do you prefer wider bands to narrower ones?  How about the “Small band/big cups vs. big bands/small cups” debate?  What do you think about the female habit of weighing ourselves so we can compare a metric that means basically nothing?  Do you want to run with me?  What does your back look like? (You know, answer one or some or none of the above…)

This will be the last bra post for a little while, because starting tomorrow I’m spilling the beans about the Tiramisu Dress pattern, Cake Patterns, sharing knit guides and tips, and we’re having a pre-sale of the pattern (deep discount!) as it goes to print!  Squee!  I really really can’t wait to show you what’s been going on.

Finished Object: The Fugliest Bra In The Universe

Please, please don’t read this if you know me and don’t need to know about my breasts or underwear or discussions of size upset you.  /end disclaimer. (Also, the banner picture is from grocery shopping today at the markets.  I thought the mushrooms looked gorgeous, and the soup I made from them was even more wonderful.)

So the other day my package arrived from Annele at Makebra.  I got really excited when I discovered her site.  I finally felt like I could tackle bra sewing, and I posted about it enthusiastically.  So many of you went to visit her, Annele wrote to me and we’ve kept up a lively email chatter since then, most of it centering around my boobs.

Annele knows about bra-making, I’m in awe of the depth of her knowledge and wish I could absorb all of it right now.  She’s interested in my sizing issues and understands my lack of dsicretionary funds, so she was kind enough to send me two extra sizes to try and a few extra bra-bits.  Thank you, Annele!

Apparently, I’ve always worn the wrong size bra- “big” band and “small” cups.  Apparently, lots of women do this partially due to the laziness of bra manufacturers and partially from habit and inertia.  I mean, cup size is sort of hard-wired into our sense of identity, isn’t it?

But I started paying more attention and even uncovered a bra hidden in the depths of my dresser that fits better than anything else.  It’s a 12E.  (US 34 DDD/E, UK 34F, EU 75G- convertor here) Yeah.  E.  It’s the best fit I have, but I think the cups may be slightly too small.  The “gore” (middle part) doesn’t lie flat against my chest, though the entire bra keeps me comfortably uplifted through the day.

Chasing bra fit (not to mention learning to sew bras) is something completely new to me.  I know, I know, I should know better and I do.  I really do.  I don’t really like having large breasts and never have, so my reaction was to generally ignore them.

It’s a pain to have a large bust.  People assume things about you that aren’t necessarily true (hey, sexy lady…), bras don’t fit, blouses gape, most clothes make you look much heavier than you are unless they’re carefully close-fitted, they start succumbing to gravity from the age of 25 and girlfriends roll their eyes when you whine about how much it sucks to have big boobs.  So I’ve kept my mouth shut and more or less ignored them up to now. (Though we were on pretty good terms while I breast-fed Lila…)

Anyway, my package arrived form Finland and I tore into it like a ravenous raccoon on garbage day.  The first thing I noticed- no instructions.   Bras are one of those things you can easily sew if you know how to sew them, but what if you don’t have a clue?

These are the two patterns I chose to work from first- 80 F and 75 G.  The band sizes are different, but the cups are the same size.  Here you can see the pattern pieces for the foam cups- they’re identical.  The instructions are minimal.

I didn’t actually know where to start.  Learning a new skill always means a steep learning curve, and I expected I’d have no idea what to do with all these bits and pieces.  It helped to look closely at everything and take stock.

Fold-over elastic for binding the top edge of the bra.  It’s also used to bind panties.  Simply fold it over the raw edge and zig-zag it down.

Bra elastic- very firm, I used it for the band and the straps in this bra.  1/2″ or 1.2cm wide.

Bra backs and rings and sliders.  I’d lump these together under the name “findings.”

Annele also sent me a 75DD bra pattern and underwires.  They’re the size I “should” wear according to traditional bra sizing methods that add 3-4″ to the ribcage measurement.  They are the smaller underwires here.  When I held them up to my body I could see immediately they would cause nothing but pain and torture should I decide to make the 75DD and wear it.  I set them aside.  If you’re a 75DD, email me and you can have the underwires and pattern for the cost of shipping.  They’ll just gather dust here.

And finally, the underwire casing.  It’s a nice soft and tough casing for the wires and is stitched in below the cup for support.

I put all the little bra bits into a wooden cigar box for safekeeping.  Tobacconists often sell them for next to nothing and they’re ridiculously useful.  I have several in my sewing room.

The first sewing step on the Makebra site (no paper start up instructions) shows you how to make the foam cups.  The foam is pretty standard and not interesting, I’m already thinking I can use other materials in place of the foam (hemp fleece…) once I master the trick of sewing bras.

The cut edges of the foam lining butt up against each other with a zig-zag stitch to hold them together.  I opted to use a triple-stitch zig zag, it’s less prone to tunneling.

Viola, the completed boulder-holders.

I cut the bra pieces from a piece of remnant purple rayon jersey leftover from one of my Bow Tie Tees.  It took less than 20 cm (8″) of fabric.  I love how little fabric bras use!

I used the 80 F size first.  Like I said, the only difference between the two bra patterns is the band size, you can see it here.  I like that the pattern has little colored seam allowances, it makes it easier to understand where I will sew.

My chosen cup style comes in three pieces.  I ought to have marked right and wrong sides, or chosen a fabric with an obvious right or wrong side.  Either way, I didn’t and ended up making myself two left cups.  I swore gently and re-cut a right cup.  Again, the instructions for this step were pretty non-existent.  However, it was not complex and actually rather self-explanatory once I paid attention to the diagrams that came with the pattern.

After some head-scratching and plain old experimentation, I ended up with something that resembles a bra.  Not so bad, right?  Right?

Sigh.  There we go.  The fugliest bra in the world.  I didn’t line the cups because it wasn’t in the instructions.  I will for the next one.  I also mis-aligned the underwire casing and stitched it *to* the cup rather than *around* the cup on the band.  That’s ok.

Yep.  Super bad.  I’d never buy something that looked like this.

If you’ve been reading for a while, you know I have a tendency to just jump in with new projects.  I’m that kind of learner.   Sure, read a bit ahead of time, but I don’t try to figure out everything before I “get my hand in.”  I don’t mind making mistakes and not knowing what to do, I’ll make it up or figure it out.  I know others aren’t like that, and that’s cool too.

When I approach a “new” skill, I don’t put a lot of pressure on myself to make a perfect new thing.  There’s too much to learn at first when honing a new skill (which type of elastic goes where…?) and to expect a perfect finished project on top of everything else is just not reasonable.  I *should* make a mess the first time I try to make something “new.”  That’s normal.

I even accidentally trimmed the fashion fabric when I was trimming the seam allowance.  Lesson learned- don’t try to trim after sewing the underwire casing.  Trim first, then sew the casing.  And sew the casing to the band, not to the cup.

By the time I got around to stitching on the hooks and eyes, I had a list of things to do the next time and had pretty much written off this bra so I got lazy.  It doesn’t fit.  The band is too big and creeps up my back to settle nearly between my shoulder blades.  Not awesome.  That said, the cup seems to hold everything well, the underwires don’t dig in and it fits slightly better than most of the other bras I own.

The instructions for Makebra bras are very much geared towards someone who has sewn bras before.  Also, Annele is in Finland and while her English is very engaging and clear, the technical writing leaves much to be desired for an English-speaking bra-newbie.  That’s cool, I can’t expect someone else to do my sewing for me and I figured it out relatively easily from the pages on the MakeBra site.  In the end, I realized that sewing a bra isn’t very difficult, but does require a bit of practice.

I’m nearly finished with my second, a white with blue lined cups made from linen-cotton jersey left over from my poor doomed SpinaLace top.  It’s already much nicer than the purple one, and in size 75G.  Once I work out my system, I’ll definitely document, document, document for the other bra-newbies out there.

So tell me- have you ever, ever seen a fuglier bra?  How do you approach learning a new skill?  What do you think about the weird relationship we have between our cup sizes and our identities?  Do you have any tips for me?

Pale Skin Maintenance: Yoko Cream and What Works Best

(Or, “A Break from the Minutiae of Making a Dress”)

I had some errands to run today in Chinatown, as did my husband, so we drove out together.  I finished up first so I spent some time trolling the ethnic food shops in the area while I waited.  I love ethnic groceries- for the food and also because they offer a glimpse into daily life in another culture.  What products do immigrants miss most that they can’t find?  Which are irreplaceable elements of a transplanted culture?  I can’t help myself.  Grocery stores are living anthropology exhibits.  Today I stumbled across a small southeast asian grocery, tucked away on the second floor of a semi-dilapidated mall.

I stood transfixed in front of a rather large shelf stacked with this soap.  It’s a whitener bar.  I’ve been curious about whiteners since I saw them for the first time a few years ago, but I’m scared.  “Today is the day,” I thought.  I picked it up and had no idea how to pronounce any of the ingredients on the box- usually a bad sign.  I put it back, even though it smelled nice.

I moved on to Yoko Face Whitening Cream.  I don’t tan, I cover up in the sun, but I am not obsessed with being “the fairest of them all.”  Genetically and geographically, it won’t happen.  I am happy to be myself.  (Though I’d like to be the best version possible.)

However- I miss one element of tanning.  When my skin is tanned, the color covers annoying spots and imperfections in my skin- it even camouflages blackheads.  Pale skin shows everything and acne scars take forever to leave; in fact, my blackheads often re-arrange themselves to spell out SOS messages when I don’t exfoliate regularly.  It’s amazing.

Click for source

So I looked at Yoko and thought- what’s the harm?  How does it work?  Will it work?  I whipped out my phone for quick google search of Yoko Face Whitening Cream.  Some hate it, some swear by it, some use it as foundation but the major concern for me was the mercury found in the cream a few years ago, and the fact that Malaysia banned its sale and distribution.  Right.  No Yoko Face Whitening Cream for me.

Plain yogurt does a great job.  When I feel like it, I squeeze in half a lemon which has a mild “bleaching” effect on any dark spots.  (It tingles a little, but if you try this and it burns rinse it off quickly.)  Sometimes I mix in oatbran.  It works really, really well for me- those marks fade out and the yogurt leaves my skin dewy.  Just slap it on thickly, leave it for 20 or so minutes, and cleanse.  If I leave it longer than 20 minutes my skin gets “fat.”  It’s ridiculously cheap.  And I don’t have to worry about mercury and God Knows What Else.

I kept thinking about the mercury all afternoon, and historic lead and arsenic based makeup, and tanning beds and plastic surgery- How do you know if you’re looking your best or just being obsessed?

Where’s the line between maintenance and vanity?  Is the line drawn when vanity causes physical harm to the person, or is there another place to draw the line?  Where’s your own line?  I’d like to hear any thoughts on this, y’all are an interesting crowd.

Have you ever tried face whitening creams?  How was it?

(Edited to add: I can’t help but post this picture I hastily took when the grocer was giving me the “buy something or get out” look.  It’s a bag of Hershey Kisses- $13.95!!!  They’re not common here.)